We bought this house for the backyard and a little over two years later it’s finally USABLE!!!! So excited to share our colorful, California backyard reveal with you all today. I know it’s been a long time coming! Ha! We started dreaming about what this space could be like the day we moved in, but didn’t break ground on it until this past spring.
This renovation is the first one that cost FAR more than we expected, so we really took our time as we narrowed down and focused in on our top priorities after estimates started to come in. We still want to add a few things to it down the line, but for now we are just SO SO thrilled with how it turned out and spend almost every evening out here. I’ll break it all down for you below, along with some cost estimates and the things we’re loving (and even regretting!).
But first some below and afters…
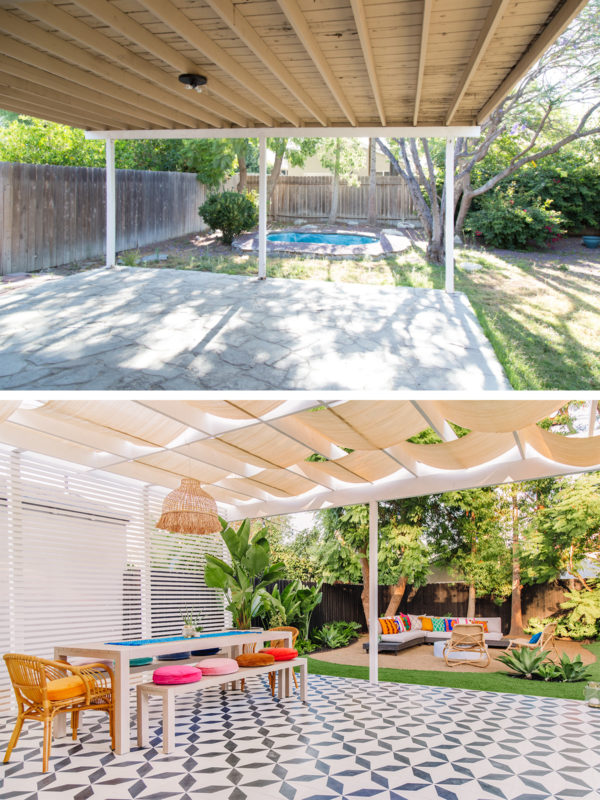
Quite a difference, huh!?!
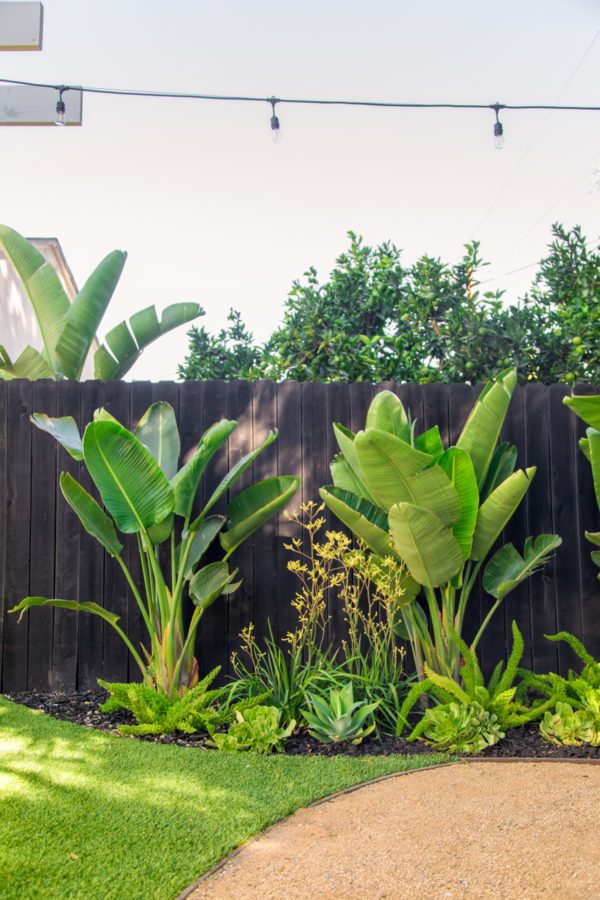
Landscaping + Plants
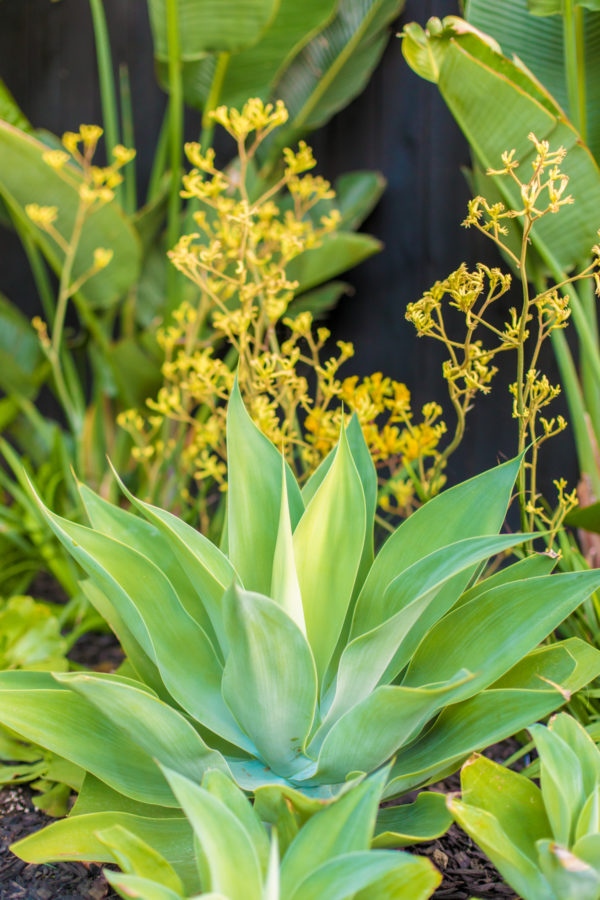
Look at all our pretty plants!!!!!!!!!!!!
We worked with Rachael at Upcountry Design to do our landscaping design and she was SO WONDERFUL at bringing our vision to life. And helping us figure out what our vision even was, too. Ha! We both wanted the yard to feel really lush, but manageable, and we needed it to be entirely kid safe. And now it is!! Here’s the full “plant palette” Rachael used for those of you that speak plant:
- Strelitzia Nicolai (Giant Bird of Paradise)
- Asparagus Fern
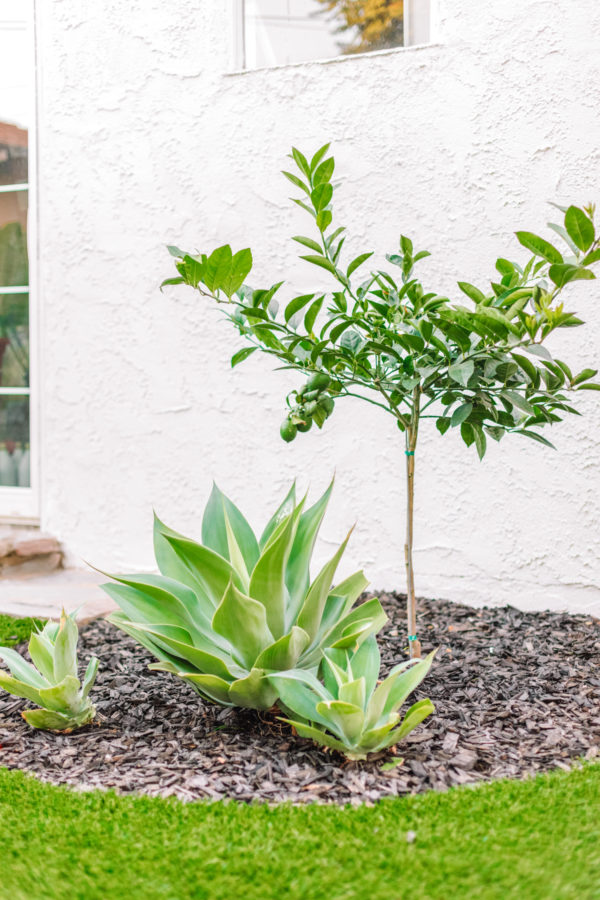
- Agave Attenuata
- Kangaroo Paw
- Philodendron
- Green Aeonium
- Meyer Lemon Tree
Rachael and her team also put in a drip system to keep the plants watered and healthy in the most efficient way possible!
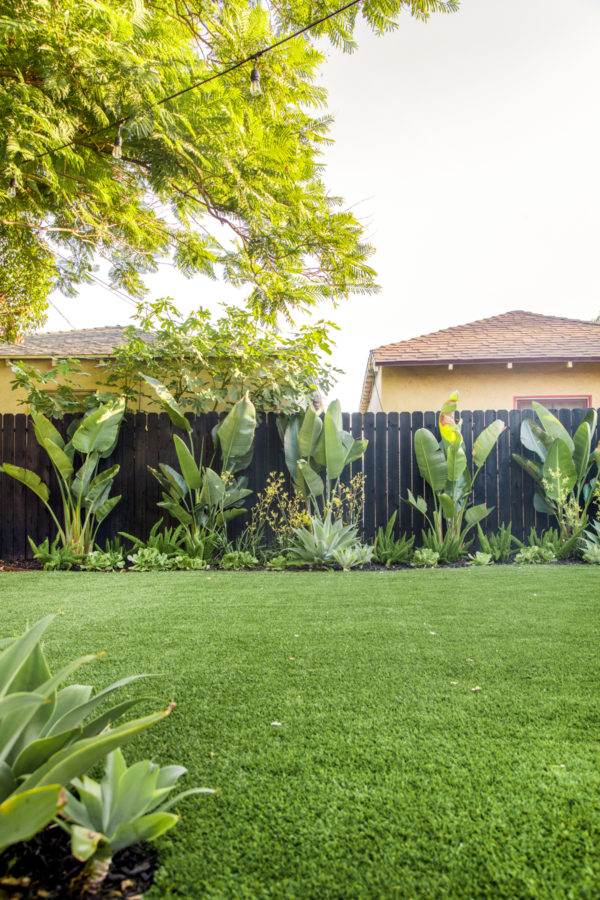
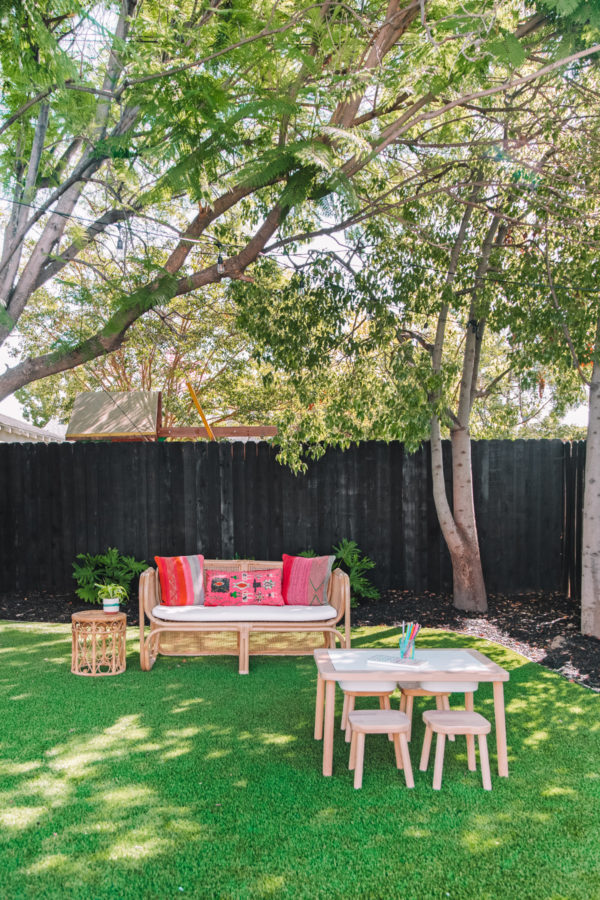
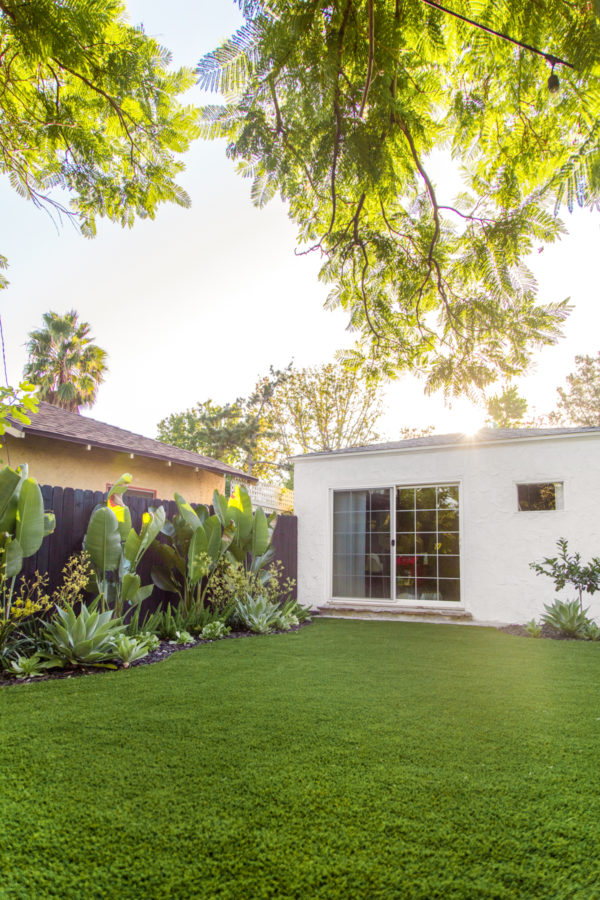
Turf or No Turf?
We wanted to break up the yard into three areas: dining, lounge and play space. For the play space, I can’t even tell you how many times we went back and forth on whether to use real grass or artificial turf for the yard. Ultimately, after chatting with Rachael, we went with her recommendation for artificial turf because it was the most low maintenance and fit best with our lifestyle. A few months in and we are SO SO SO SO happy we finally made the leap because it is so nice to never have to worry about it.
If you’re thinking of doing turf too, just be sure to find a company that uses high quality, non-toxic materials that are safe for kiddos. The quality of turf can vary A LOT.
The two most common questions I get are…
- How much did it cost? I think our final total for the turf (we covered just over 1,000sq ft.) was around $13k. Yeah, it wasn’t cheap, but we feel like it was really worth the investment for us!
- Does it get hot? Yes. Like, really hot in the sun in super hot temps. Because of how our house and trees are situated, half to all of our yard is in the shade almost the entire day so it hasn’t been an issue for us. Honestly, when it gets up into the 90s+ here we usually don’t want to be outside regardless, but when we are, we just hang on the shaded parts. It hasn’t been an issue at all for us!
Our Black Fence
When we moved in, we had the “back” of the fence facing our side along the far end of the backyard, and the “right” side of the fence on both sides. Honestly, the entire fence isn’t in great shape but we didn’t want to spend the money to replace it since it still “does it’s job” so we had the back fence re-faced.
A lot of you were shocked that we went with a black fence. I was too! Ha! But because the new fence was, well, new and the other ones were not, they were very different colors. So to unify it, we had two options: 1) paint the fence any color or 2) stain it a dark color. After weighing both cost (stain was cheaper) and durability (everyone said stain held up better), stain was the winner! I’m not a fan of dark wood fences, so that’s why we went with a black stain! I was nervous since I’m usually drawn to light colors, but I really love the contrast and how the plants pop against it!
I didn’t get the name of the exact stain we used, it all happened kind of fast and unexpectedly (long story) but a lot of people told me Benjamin Moore makes a great black stain if you’re looking for one!
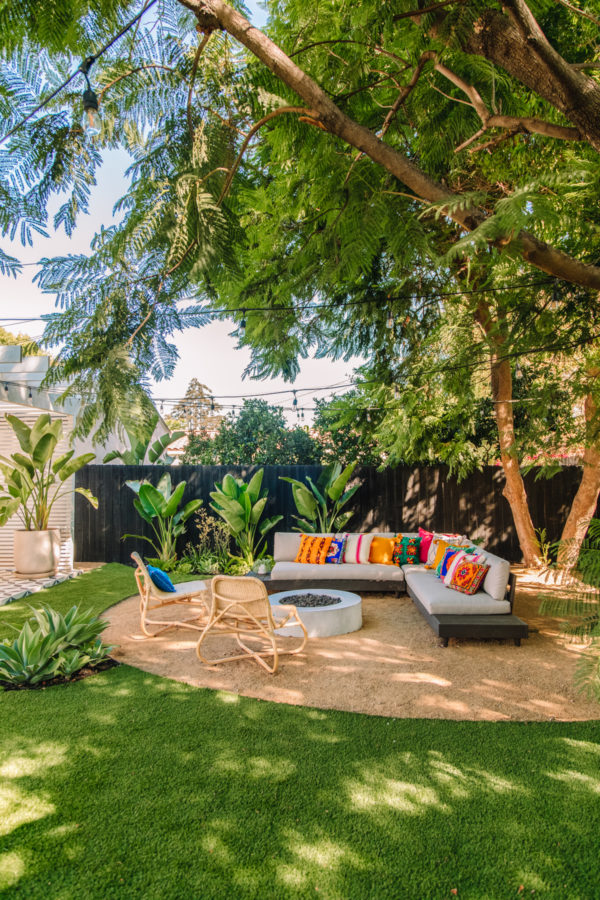
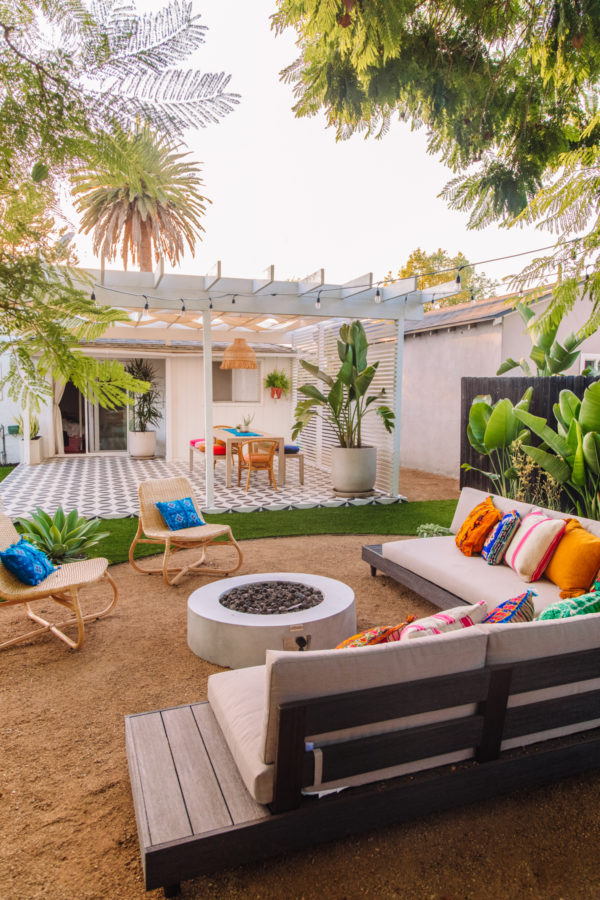
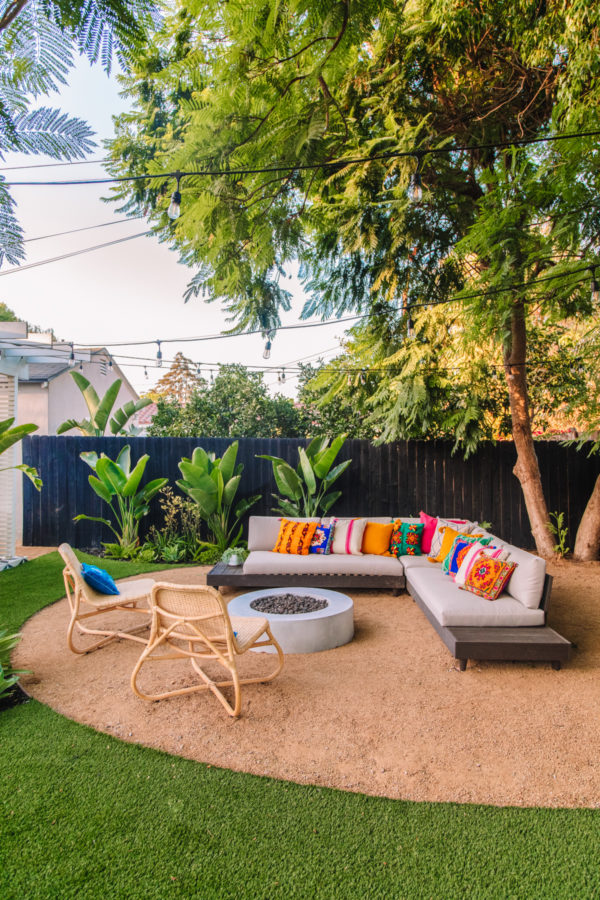
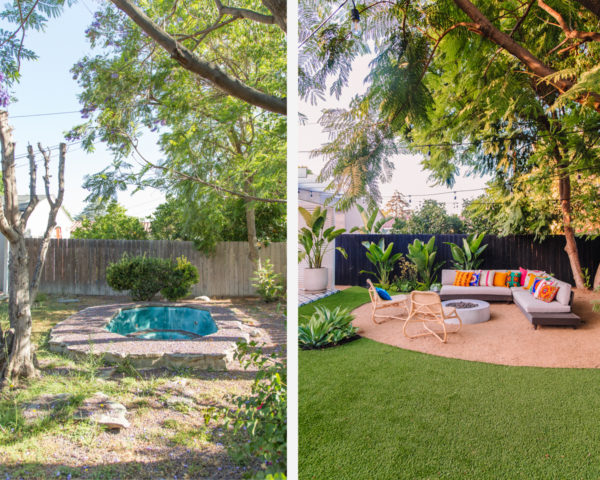
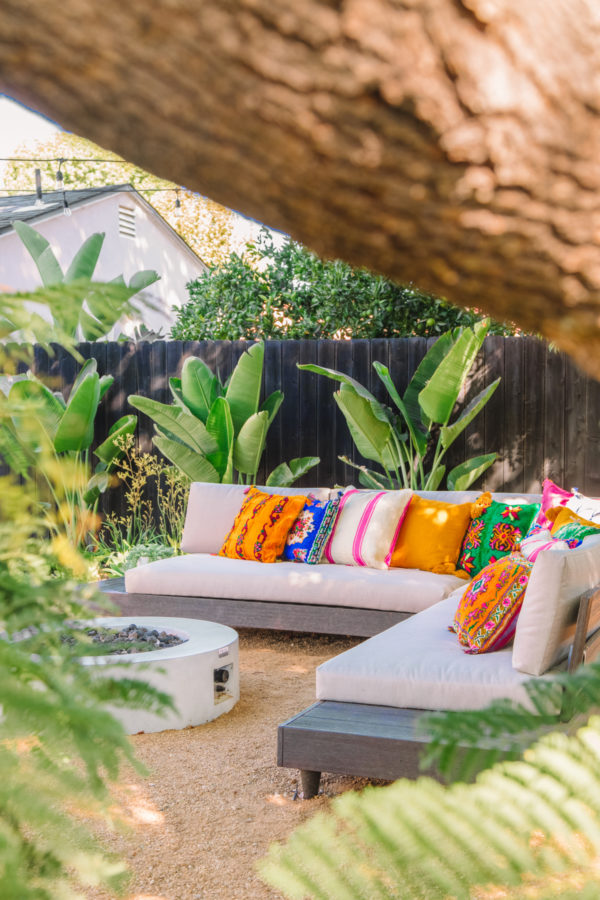
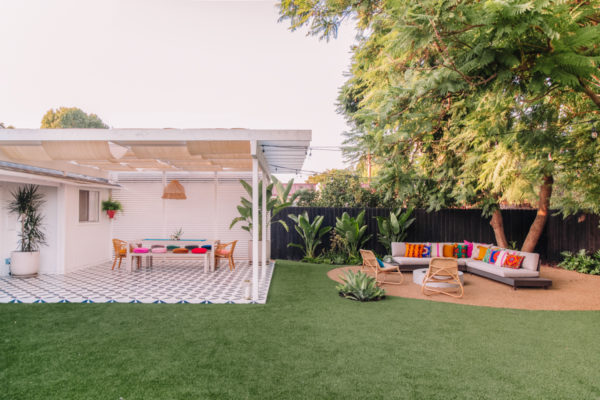
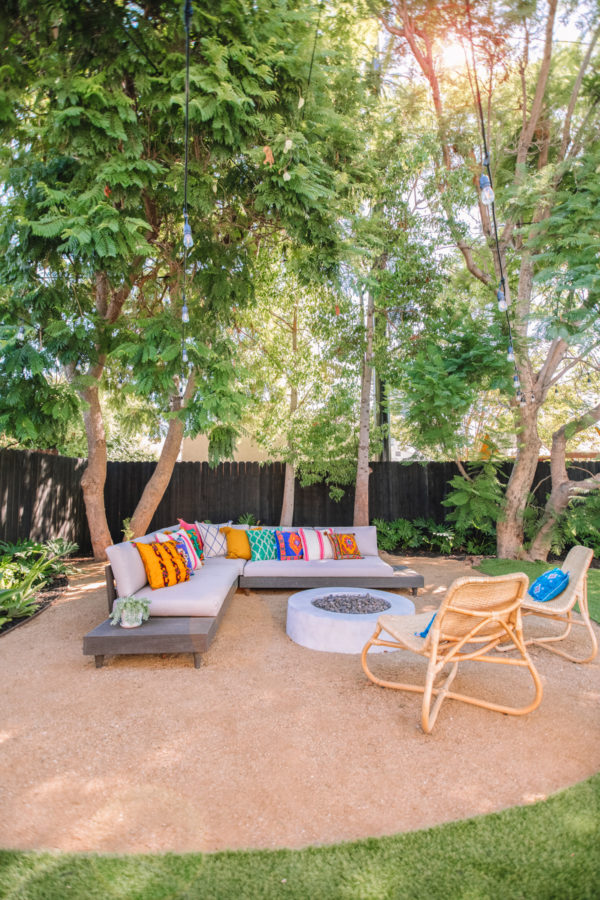
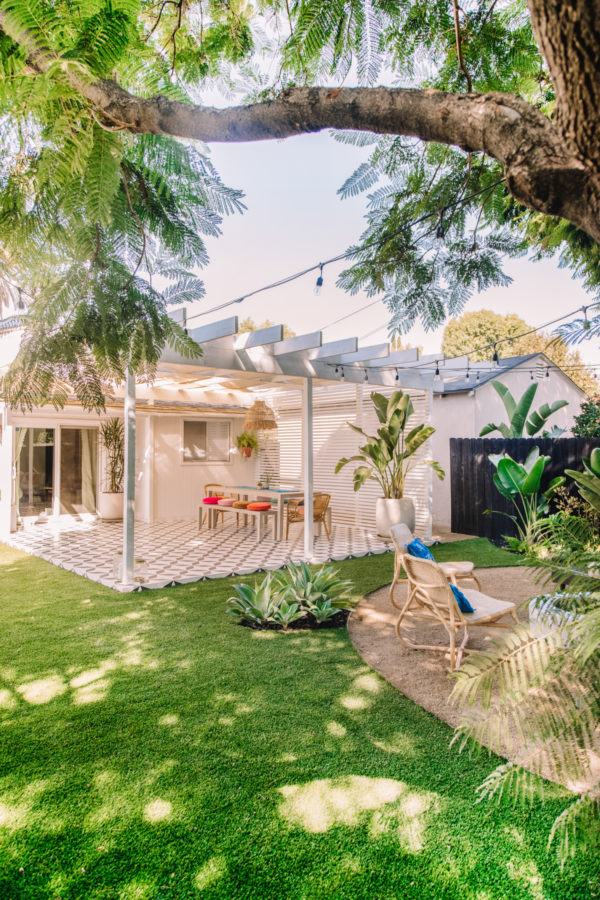
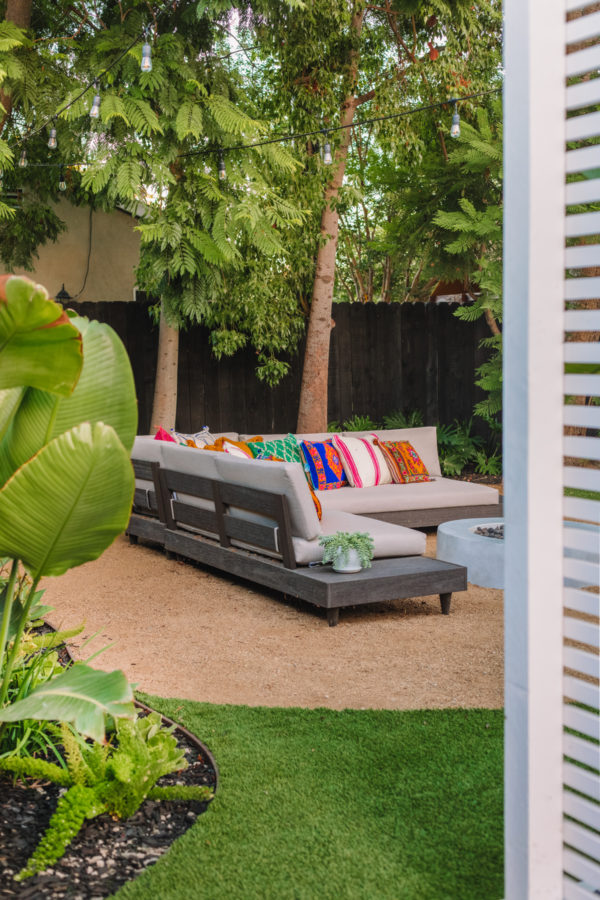
The Lounge Area + Decomposed Granite
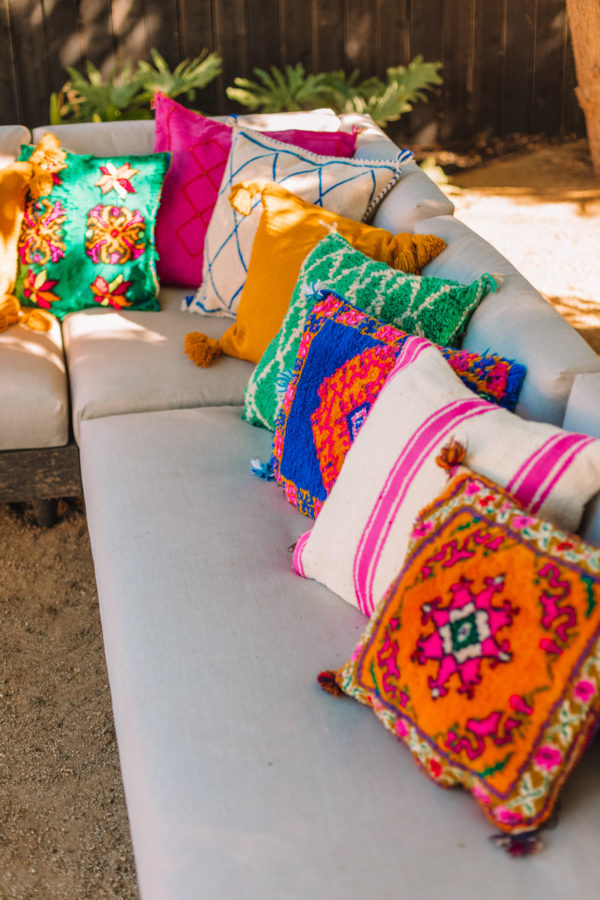
For the lounge area, we wanted the biggest couch we could find and a fire pit. My brother has a fire pit and we spend every night around it when we’re there, year round! We went with this sectional from West Elm and it is seriously SO comfortable. I am so so happy with it, and it’s so nice that all the cushions are easily removable so we can store them away and/or clean them as needed. I added a bunch of pillows to add some color. They are all made from Moroccan and Turkish rugs and I loooooove them!! They aren’t “outdoor safe” so we’re going to find some sort of storage chest to store them in when they aren’t in use.
For ground cover in this area, we had a few options: continue the turf or break up the area with another material and in the end we chose the latter! For both cost (we tried to cut turf costs wherever we could!) and visual reasons, we went with decomposed granite (also known as “DG”) which is kind of like a rockier sand in texture but it’s compacted so it’s a more solid surface.
We really love how it looks, it breaks up the yard and really anchors the space. But I’m not gonna lie… it’s not nice to walk on and all Arlo wants to do is dig in it all day. So, that’s been interesting! Ha! We told Arlo he can only dig in the area behind the couch and that seems to be working for now. 😉
We knew both of these things would be likely going in and still went ahead with it, so we don’t necessarily regret the choice. Just being honest if you’re considering it!
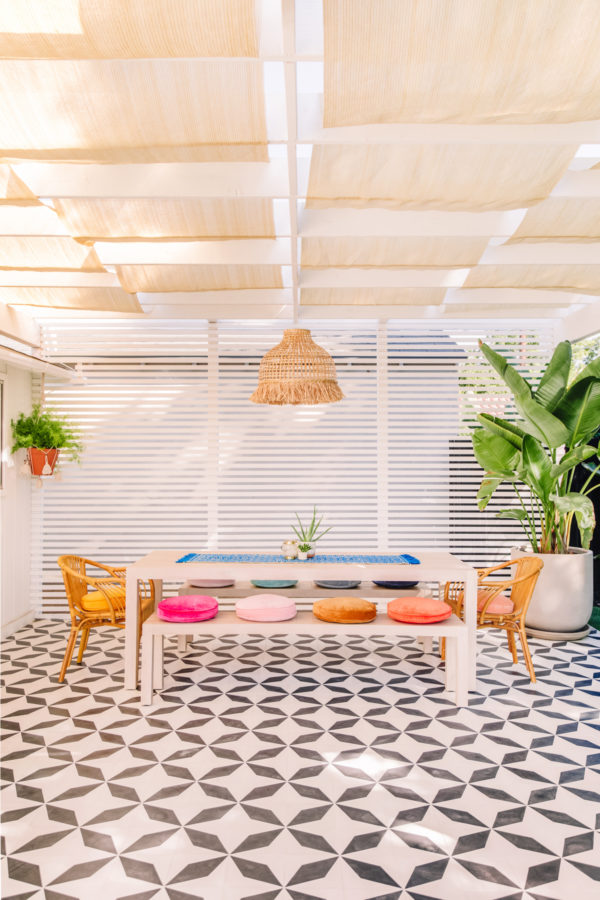
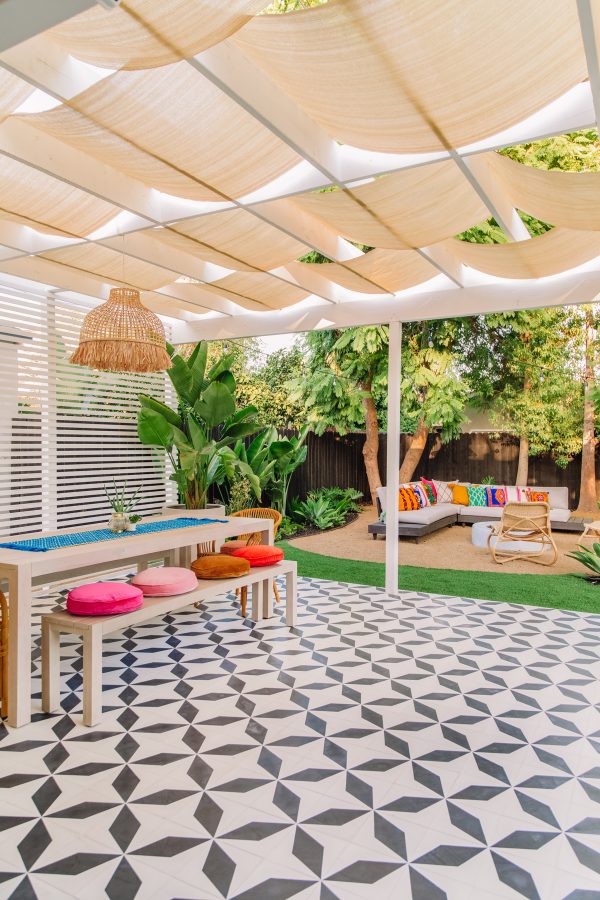
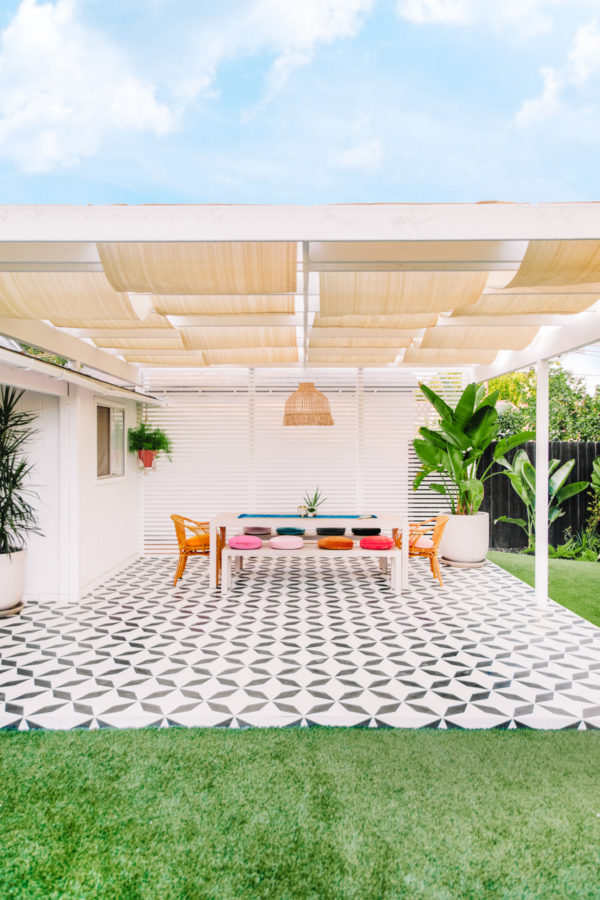
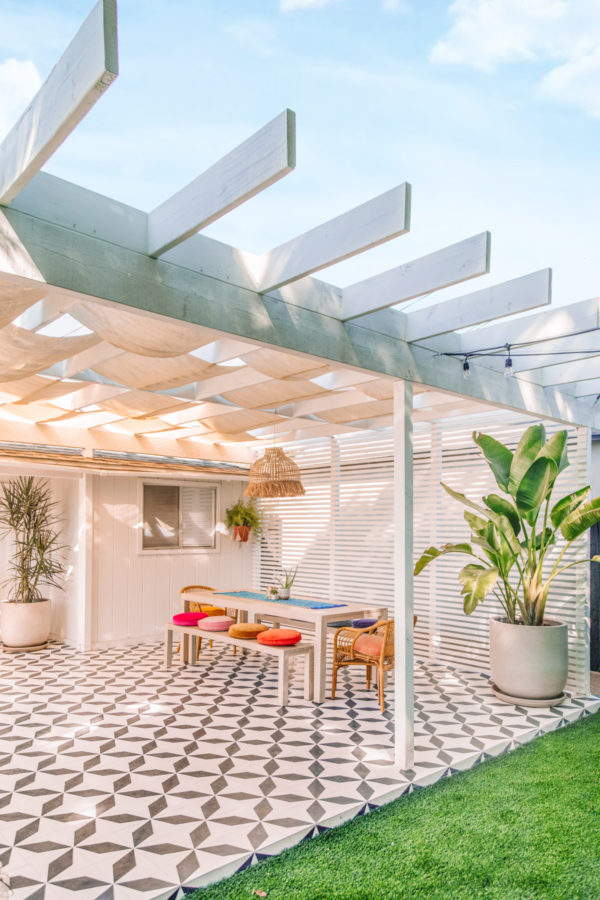
Our New Patio + Pergola
The old pergola was rotting so we had to tear it down. In place of it, we knew we wanted something more modern, open and airy… but we still wanted some shade and privacy out of it.
We ended up building a slatted wall down the side that faces our neighbor’s garage and it’s maybe my favorite part of the whole yard!! It makes such a nice statement, creates a nice pathway to the backyard from our side yard and acts as a great backdrop for food, a bar, etc. when we host parties or get togethers.
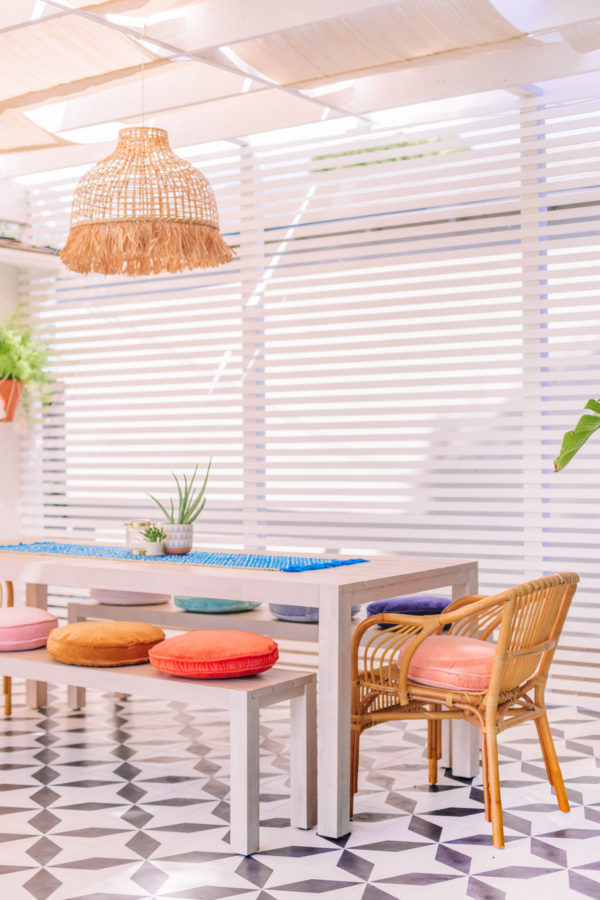
For the “roof” we made it way more open and minimal and then DIY’d some simple shades out of this sun shade material. It gives the perfect amount of shade protection while still letting in light and air so it’s not stuffy under there.
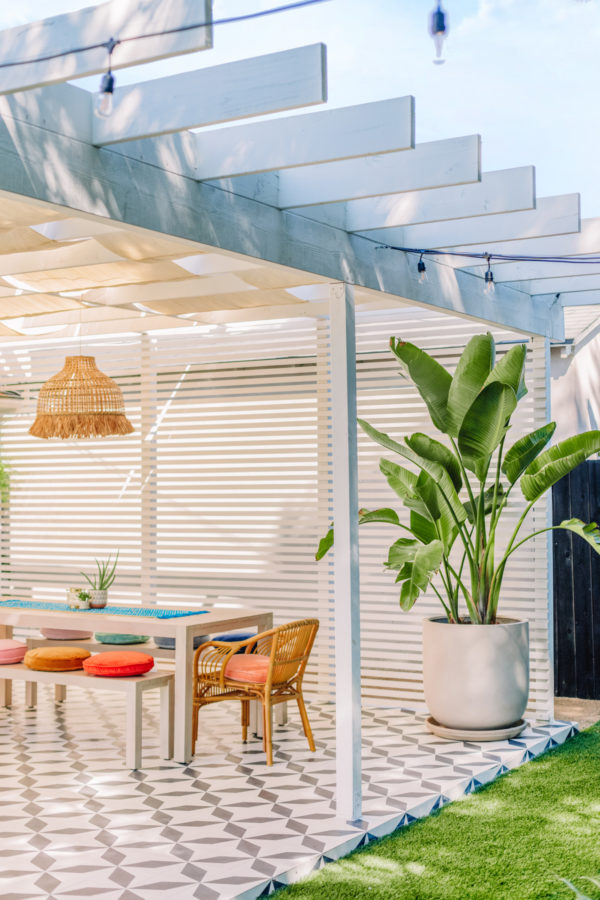
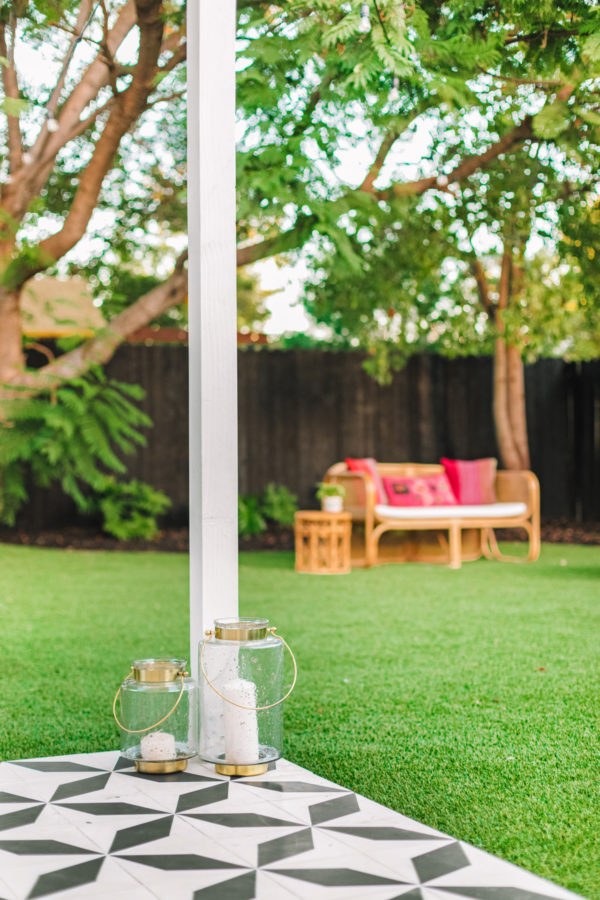
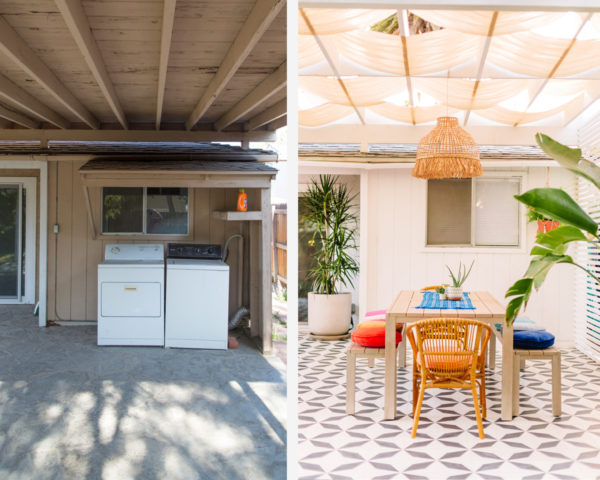
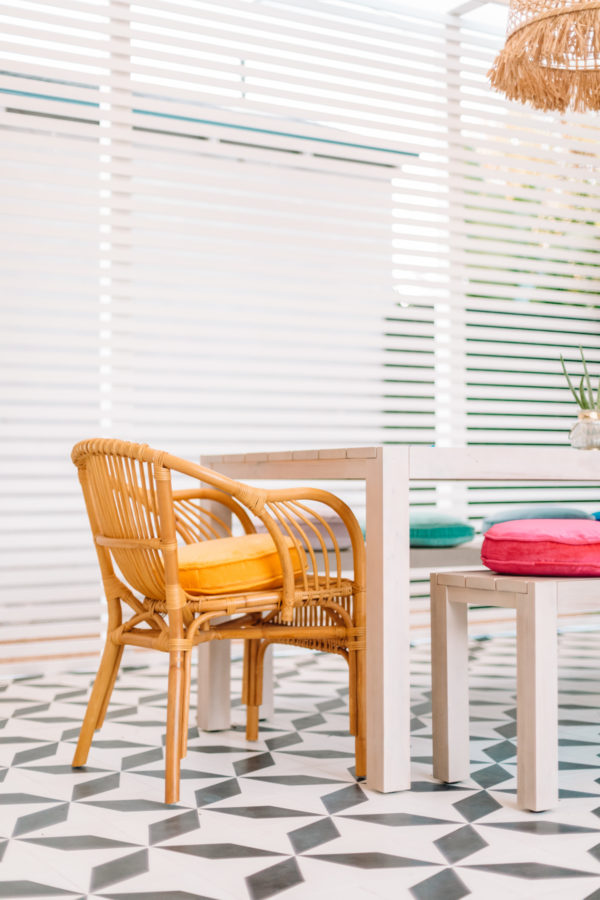
We replaced the old stone flooring with this tile from Zia Tile and it made maybe the biggest difference in the whole yard. I love that it ties in the black of the fence, but it still light, bright and graphic. We kept the furniture simple with just a table and benches for now, but may add a credenza/bar type table under the window for food overflow when we entertain at some point!
The new pergola/privacy wall cost about $10k, a lot of you asked about that! You can find a DIY tutorial for a similar wall here which is one of the inspo photos we sent to our contractor! If you’re handier than us, you can go the DIY route!
Outdoor Lighting
We added string lights over the lounge area and it really lights up the whole yard which is so nice! It makes it feel super cozy at night, too.
We added one sconce by the door on the patio, and had intended to add two more by the table, but turns out the existing electrical over there was illegal and dangerous and it was too costly to re-do it the right way, so we just had our electrician remove it entirely.
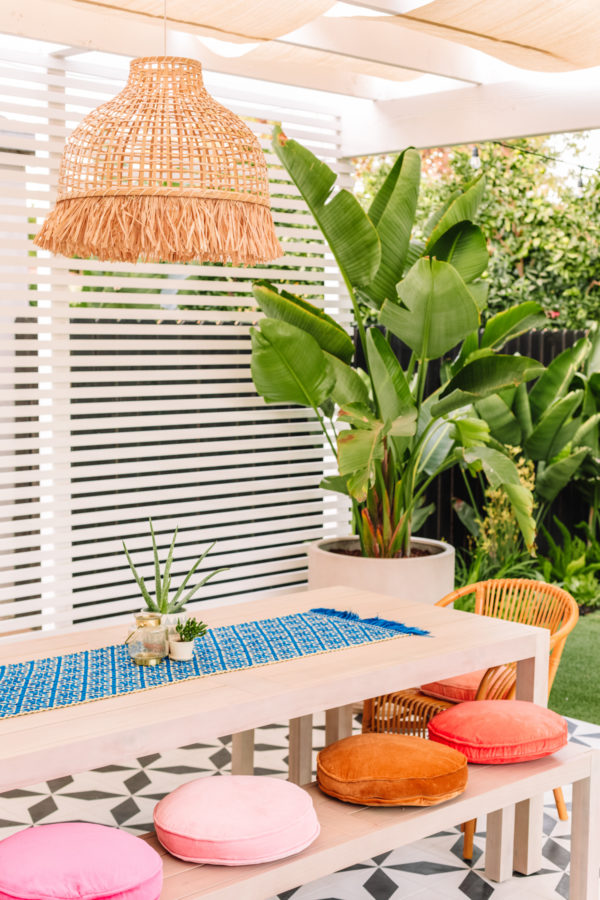
The basket light hanging above the table is an (indoor) IKEA lampshade that I DIY’d using a grass skirt from the party store. It currently doesn’t have a light in it, but we’re likely going to hook that up in the near future and use that as our light source here!
On “Phase Two”
We still have a few things we want to add to the yard in what I’m calling “phase two”! First, we’re still hunting for the right play structure for Arlo. We definitely need something (to keep him out of the DG, haha!) but keep going back and forth on swings vs playset vs playhouse and what will get the most use and also fit the best in the space/vibe we have. Stay tuned!
We also still need to add a grill… somewhere! We are thinking of putting up some sort of screen by where our water heater is (not pictured) to cover it, and may place the grill in front of that.
And last, we’re hoping to add some more lighting on the “play” side of the yard. Again, for cost reasons, we didn’t want to pay to have it done but when we start work on the garage-to-playroom conversion, we’ll be able to update the electrical in both spots at once which will make things more cost effective!
All in all, we are so thrilled to finally be able to USE this space!!! It feels like we doubled the size of our house, because we kind of did honestly!! This was our priciest endeavor on the house but also one that we’ll get the most use out of, and likely the best return on investment when we sell someday too!!
Photos by Jeff Mindell
Eeeep! Can’t believe this is the same yard!! Jeff took the “before” photos when we first bought the house, but honestly, it looked 20 times worse by the time we started the renovation haha! So it really feels like the CRAZIEST difference. Everyone that comes over is like “woah.”
The best part about living in Los Angeles is getting to enjoy outdoor space year round, and we’re so grateful to have it now!!
Sources
Landscaping Design: Upcountry Design
Patio Sources
Tile: Zia Tile*
Table | Benches | Chairs
Table Runner | Penny Cushions
Sconce | Basket Light from IKEA (+ DIY’d) | Large Planters | Lanterns
Pergola Shades
Lounge Area Sources
Outdoor Sectional* | Rattan Chairs
String Lights
Pillows: Soukie Modern and Badia Design
I’m not linking our fire pit because I bought it from a company I no longer support, and honestly we don’t like it anyways! It has almost no flame and we may replace it at some point.
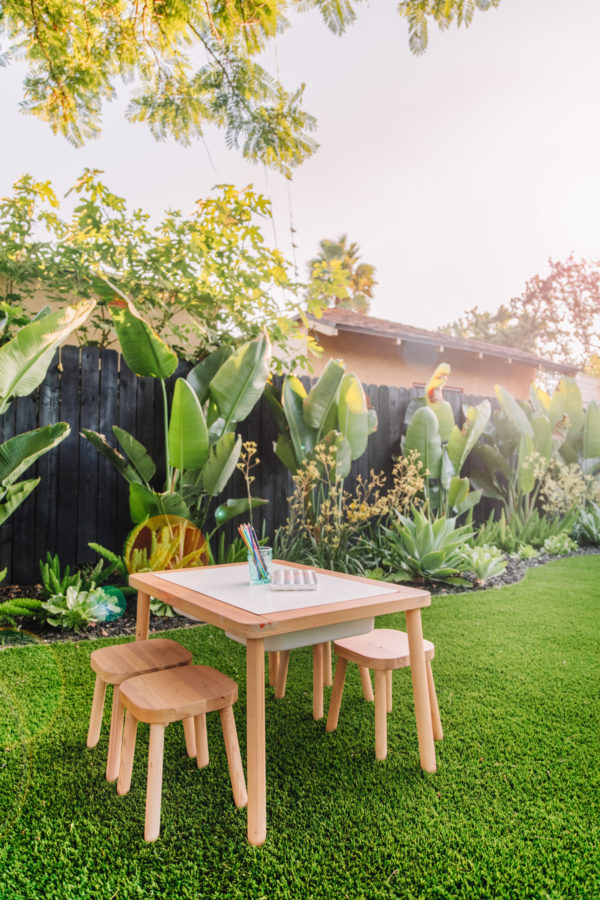
Play Area
Rattan Love Seat | Kids Table + Stools
*Indicates an item that was gifted in exchange for coverage in this post. All opinions are my own!
Comments
Post a Comment